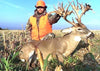
10 steps to getting the perfect shot
Finally, the weather is perfect, it’s a cold, crisp morning,sligt breeze in your face, the Sun is just peeking above the trees, the world is waking before your eyes. Suddenly, out of nowhere comes the buck of your dreams. You slowly reach for your bow, pull it back, settle your pin on his vitals, take one last breath to calm your nerves, and then touch off your release. SMACK!! You smoked him, perfect shot, he runs 30 yards and piles up its all over in a matter of seconds. You’ve done it. All your hard work, blood,sweat and tears you put in this season have just became worth it. Boy are the guys at the tagging station going to be jealous. You are going to be the talk of the town, NO, the talk of the state. You can already hear the your phone ringing from field and stream wanting to post your monster on the cover the their “Deer of the year” issue. You take a couple halfassed snapshots field dressing and head to town for the big event, texting everybody you know on your way. After that, it’s off to the taxidermist. Now Monday morning comes around and time to show off pictures to all your coworkers. You pull your phone out and that’s when you realize your buddies finger was covering the lens when he was taking the pictures. It’s too late now, the deer is at the taxidermist, and you won’t get him back for at least a year, if your lucky.
The preceding story is completely true, give or take a few details and ufortunately it happens hundreds of times every year across the country. We have no problemspending countless hours scouting,setting up treestands and checking trail camera, but then we don’t have a extra 15 minutes to make sure we get some great pictures of our trophy. I am just as guilty as the next guy, the biggest buck I’ve ever taken is by far the worst picture I have in my photo album. I still get mad every time I come across that picture. Why didn’t I spend a little time to make sure I had a great photo before I left the field. It’s because of that picture that I writing this blog, so hopefully you won’t make the same mistakes as I have.
Camera. With technology today there is few reasons any hunter does not carry a digital camera with them on their hunts. They have become very user friendly and for the most part inexpensive. Even if you don’t want to a invest in a brand new camera that is going to get thrown around in your backpack, a little searching on the Internet or even asking your friends and family, you should be able to buy a used one cheap.I personally recommend one that has at least a 8 megapixels and a good flash. Then I also recommend buying a small waterproof hard case that the camera and a extra set of batteries can fit in. Another option for those with a bigger budget is to but a good outdoor camera. One that is water, dust, and shock proof, especially those of you who tend to hunt in wetter environments.
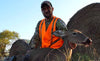
Respect to the game. Giving respect to the animal you have taking should always be your first priority.Take time to clean up the deer. Give special attention to cleaning blood away from the mouth and entry wound. And for shitsake please push his tongue back is his mouth.
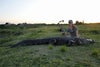
Background. When picking the best spot to take your photos, be sure to choose a spot where you can be slightly elevated above the photographer. If possible take the pictures in the same area where the deer was takin. If that is not a option fosome reason, choose a area that has a similar geographical features, rather it’s a wooded river bottom, open grain field, or a baron Sandhills pasture. Avoid areas were there will be dead grass and tree limbs in the background as the antlers tend to blend in. Also avoid having unnecessary distraction in the background, such as vehicles, farm houses, or other people.
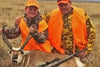
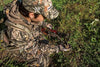
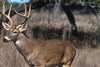
Foreground. Take time to remove any unnecessary items out of the area that might be in the photo. Remove any coats, gloves, backpacks or other gear that will just be a distraction in your photo. Make sure there is not a excessive amount of blood on the grass and if you have field dressed him, that the gut pile is not going to make an appearance. Posing with your deer. Try to pose the deer in as realistic of a position as possible. Have him sitting on his stomach with the front legs tucked under him as if he was bedded down there. Position yourself towards the back half of the deer with the deer angled slightly towards the camera. Use your knee you help hold the deer upright if necessary. You do not want to be behind the deer’s head, as the antlers will blend in with your camo.
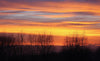
Lighting. The best lighting to take a photo is in the morning and in the evening. Unfortunately we don’t get to chose what time of days we take our trophy. Whenever possible we will wait til evening or even after dark to take our photos. Obviously that is based on the weather and how much time we have to wait. If you are forced to take your pics during the mid day try to avoid overly shady areas, as this will cause you and your deer to be very dark when the photo is developed. Instead have the deer out in the sun, just adjust his angle so the sun does not cast shadows on you or the deer.
All about the angles. The correct angle can make all the difference in your final photo. Always have the photographer be at or below eye level with the deer. Placing the deer on a slightly elevated position will help with this. Also have the photographer get as low to the ground as they can. Again, if possible try to have the antlers above the skyline to help them stand out better. Taking photos at a downward angle will make even a giant buck appear average. It is not uncommon for us to drag a deer 100+yards just to get the right background, elevation and angle to take our photos.
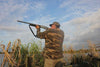
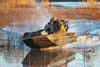
Take more pictures. You can not take too many pictures. Have the person running the camera take several photos from different angles and positions. It’s does not do you any good to take 20 of the exact same photo. Constantly adjust the deer, turn his head a little more left, then back to the right. Again having the photographer continually changing their angles, up, down, left, right. You will be amazed when you view them later how much different the deer can look in each picture. I recommend 4-5 pictures of each pose from different angles. After taking several, stop and view them to see what you need to change and to make sure the camera is seeing what you want it to. Then take 4-5 more, and check them, then repeat until you have several perfect photos. A picture is worth a thousand words. The purpose of you photo is not only to show off your trophy but to preserve the memory and help tell the story of your hunt. If you sat through a blizzard in a tree stand for several hours to finally take your deer with a bow. Than take your photo in a snow covered field with your bow in hand wearing you heavy coat. Do not take your photo in a heated garage with a t-shirt on and a beer in one hand and a brat in the other. If you went on a late season spot and stalk hunt in the Sandhills in sub zero weather, do not take your picture in the back of a truck while wearing street clothes. This picture should help tell your triumphant story, not raise doubt on how you really killed the biggest deer of your life.
Editing. The final step takes place once you are back home and on your computer. This is where you can sort out the good ones and delete the bad ones. Pay close attention to each photo before you delete, even if you have two that look the same, make sure your eyes are open, and your mouth is shut, lol (a problem I have a lot). If you have the software feel free to do a little editing too.By editing I do not mean photo shopping a bigger set of antlers on your spike buck, but adjusting the lighting and shading of your photo. No matter if this is the first doe you’ve ever shot, or the 20th 150″ buck you’ve taken with a bow, be sure to take your time to enjoy this moment, and getsome great pictures because never now when it will be your last hunt.
Andy Thomas
Bucks of Nebraska Prostaff
Andy@bucksofnebraska.com
The post 10 steps for the perfect shot appeared first on Bucks of Nebraska.